How to Create/Edit Flex Reports
Updated May 2, 2022
The Flex Report tool gives users the ability to create “custom” reports to handle the needs of nearly any situation. Data within each module of The Magazine/Newspaper Manager can be used to create reports using information most essential to the user. When using Flex Reports in conjunction with Custom Fields, nearly any data process can be streamlined.
To access Flex Reports screen, select menu option Management > Site Setup > Website Setup, or for newer sites, Person Icon in Upper Right > Website Setup.
Under the Site Customization section click Flex Reports.
A list of existing Flex Reports is displayed.
Note: Using the blank fields at the top of the displayed list, you can search by Flex Report Name, Report Type, Type, and ID.
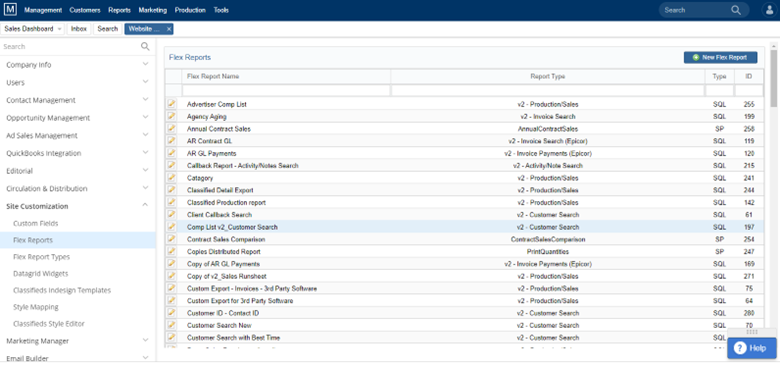
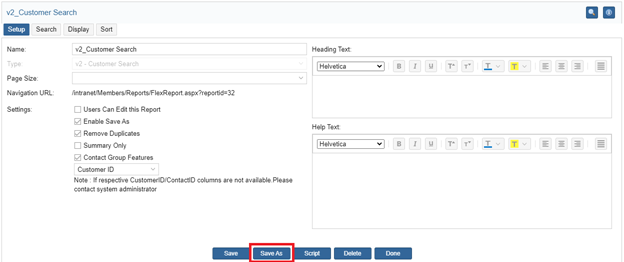
To create a new flex report, first look at existing v2_ reports to see which existing report you should use as a “base” – one that has similar search and results fields you wish to view. Typically, there is one that already exists for you to build off of. Click the yellow pencil icon, then choose Save As and rename your new Flex Report.

To delete a Flex Report, click the yellow pencil icon to edit the report, then click Delete from the bottom menu.

Select Distinct Values: Enable this to allow the user to select distinct values.
URL: The URL is used when placing the report on the Nav Bar. Once the report has been created, take the following steps to place the report on the Nav Bar:
- Open the “Report Setup” page of the Flex Report to be placed in the Nav Bar.
- Highlight the URL, right click, and select “Copy”.
- Go to Management>Nav Bar Setup.
- Scroll to the bottom of the page and find the open fields for entering a new report.
- Select the “Parent” of the report from the drop-down labeled “**ROOT**”
- Paste the copied URL into the “URL” field to the right of “**ROOT**”
- Give the report a name using the open text area to the left of “**ROOT**”
- Search Criteria: Click the pencil icon to edit a search criteria and click the red circle icon to delete.
Source Field: Source Field refers to a data field within the database. Selecting a Source Field and selecting “Add” will add the selected field to the reports search criteria. If the fields you are searching for aren’t available in any of the available “Report Types” on your site, contact your software consultant for information on creating custom datasets.
Data Set: The “Data Set” displays the dataset from which the fields are being pulled. In order to enter custom fields into either the Search or Display criteria you will need to locate the appropriate dataset.
Heading: Heading will be used as the name of the field when using the report.
Field Type: The “Field Type” drop-down menu allows users to select the type of field they would like to use when searching using the report. The five “Field Types” are as follows:
- Date Box: Selecting “Date Box” will enter a single date field in which to search the field selected. The “Date Box” can only be used to search fields that have date information (for obvious reasons you can’t use a “Date Box” to search for contact records, but you could for searching using the field “Date Contact Added”.)
- Date Range: Selecting “Date Range” will enter two date fields used to search information within a range. As with the “Date Box”, the “Date Range” can only be used to search fields that have date information.
- Drop Down: Selecting “Drop Down” as a field type will setup the search field as a drop-down menu with the available options. For example, when adding the field “Issue Year” to the search criteria and selecting “Drop Down” the available years will appear in a single select drop down menu.
- Input Box: Selecting “Input Box” will enter an open search field into the Search Criteria. Input boxes are most useful when searching by company name for example (as opposed to a drop-down menu listing all contacts).
- Multi-Drop Down: Selecting “Multi-Drop Down” will enter a drop-down list into the report that will allow for multiple selections. To use a “Multi-Drop Down” simply click the icon next to the field, select the fields you wish to search and select “Save”. This feature would be most helpful when searching production data across multiple years, or exporting multiple contact groups.
- Number Box: Selecting “Number Box” enters an open field in which to enter numbers used in the search.
- Number Range: Selecting “Number Range” enters two open fields used to search for information within a range.
Logical Operator: Choose logical operator for the search criteria.
Arithmetic Operator: Choose arithmetic operator for the search criteria.
Stored Proc: Stored Procedures are setup by the System Administrator and are used to pull specific lists of data from the database. For instance, when using the field “Issue” as a search criteria, selecting the stored procedure “spCustomReport_Production_GetIssues” will display the issues in the order in which they are displayed in the issue setup (Jan, Feb, Mar, Apr or Issue 1, Issue 2, Issue 3, etc).
Preview: From any of the tabs in the Flex Report setup the “Preview” button can be used to preview the report. When selecting “Preview” a new window will appear displaying the selected search criteria. Prior to loading the report to the Nav Bar, the “Preview” is the only way to view/run the report. For instructions on loading the report to the Nav Bar visit the “URL” text located under Report Setup, or click here.
Report Display:
- Source Field: Source Field refers to a data field within the database. Selecting a Source Field and selecting “Add” will add the selected field to the display when the report is run. If the fields you are searching for aren’t available in any of the available “Report Types” on your site, contact your software consultant for information on creating custom datasets.
- Data Set: The “Data Set” displays the dataset from which the fields are being pulled. In order to enter custom fields into either the Search or Display criteria you will need to locate the appropriate dataset.
- Heading: Heading will be used as the name of the column selected when viewing the results of the search.
- Link: Links can be setup by your software consultant to link data in a Flex Report to the appropriate page within The Magazine Manager. For instance, a link can be setup to link the “Company Name” column on a Flex Report to the contact record.
- Formatting: Formatting refers to the way in which the data is displayed when running the report. The options for formatting include: Currency, Date, and Date & Time.
- Alignment: Alignment refers to the way in which the data is displayed within a column when running the report. The options for alignment include: Left, Center and Right.
- Operator: The “Operator” field under Results Display is used when building a formula for use in a calculated column. Calculated columns can be created using any relevant datasets in the software (fields using either dollar amounts or number values).
- Value: The “Value” field under Results Display is used when building a formula for use in a calculated column. Calculated columns can be created using any relevant datasets in the software (fields using either dollar amounts or number values).
- Group: When selecting the “Group” option for a field in the display of the report, the field selected will be grouped together. For instance, if the field “Issue” is added to the display, and set to “Group”, the results of the search will be grouped together by issue.
- Total: When selecting the “Total” option for a field in the display of the report, the field selected will be totaled at the bottom of the column or group. For instance, if the field “Net” is added to the display, and set to “Total”, the results of the search will include a total for the field/column “Net”.
- Average: When selecting the “Average” option for a field in the display of the report, the field selected will be averaged at the bottom of the column or group. For instance, if the field “Net” is added to the display, and set to “Average”, the results of the search will include an average for the field/column “Net”.
Report Scoring:
- Fields: To identify fields in the report for sorting, choose the field from drop-down list and click save. Add as many fields as required.
Date Key Date:
- You can map the Source Fields to the desired data set. Click Save to save the details.
- Click Save to save the report details. Click Preview to preview the report. Click Add to Nav Bar to add new Flex Reports directly to the NAV Bar from the Flex Report Setup Page. Click Done when you have done creating the flex report.
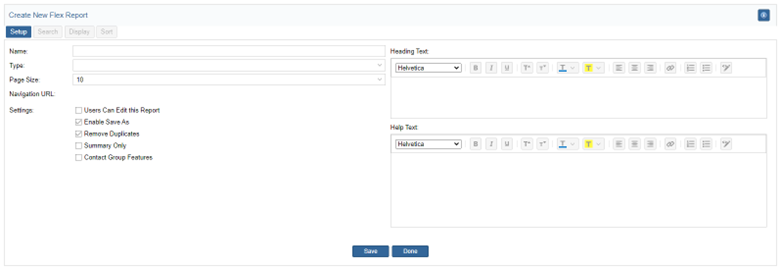
To Create a New Report
Note: Creating a new Flex Report from scratch is not recommended
- Click New Report in the upper right.
Report Setup:
- Name: Use this field to enter the name of the report. Ideally the name would reflect the purpose of the report. The report Name will be displayed only in the list of Flex Reports and can be changed when adding the report to the Navigation Bar.
- Type: The report Type refers to the dataset selected for the report being created. For instance, if you are building a report to gather/export specific information about contact records, you would select the report Type “v2_Customer Search”.
- Page Size: The number in this field determines how many results will display on the report.
- Heading: Text entered into this field will appear at the top of the report.
- Help Text: Text entered into the “Help Text” field will appear when selecting the Help icon on the individual report.
- Settings:
- Users Can Edit This Report: Users can go to the Site Customization > Flex Report and make changes to the report setup.
- Show Summary Only: When building a report and setting the “Show Summary Only” to “yes”, the report, when displayed, will display only a summary of the groupings in the report. Setting this field to “no” expands the report to display individual entries that make up the report.
- Click Save, let screen load, then click Done.
We want to hear from you!
videos relating to


