Gateway Setup
Configure the default gateway for all payments in your site’s base currency. Additional payment gateways can be set up in the CRM and assigned for use on specific rate cards. Any orders for rate cards not listed will automatically utilize the default payment gateway.
How to Setup and Edit the Base Currency and Gateway Settings
Navigation: Website Setup >> Company Info >> Gateways & Multi-Currency

- Click on edit. This will open a side panel that allows you to connect to whichever Gateway you want to use for the merchant integration.
NOTE: The CRM support 4 types of gateways – Authorize.Net, Plug N Pay, Card Connect and Stripe. - You can setup the details like – Gateway Type, Gateway Name(A Unique Identifier), Merchant ID, User Name, Password and Payment Type(Credit Card, ACH or Both), along with whether or not a CVV is required to make the Payment.

- Once you click on ‘Update’, the details are stored and will be available under the ‘Base Currencies’.
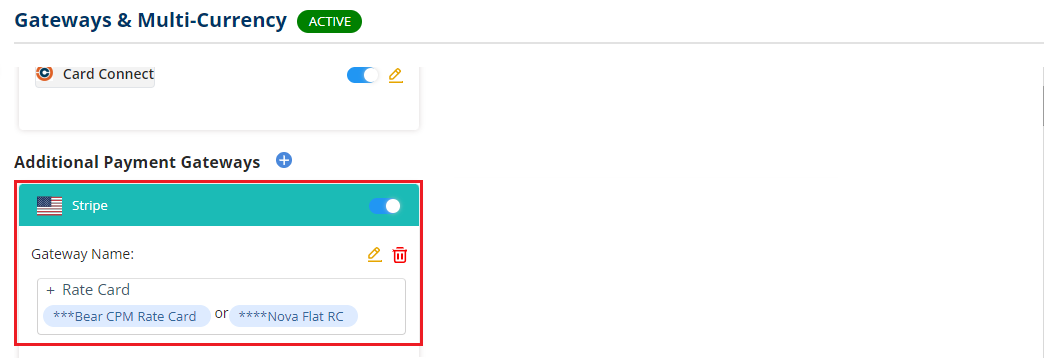
How to Setup Additional Payment Gateways
- To set up additional gateways, navigate to Website Setup >> Company Info >> Gateways & Multi-Currency and click on the blue plus(‘+’) icon beside the label ‘Additional Payment Gateways’.

- This will open the Configuration Window. Here, you can select the type of gateway to add (Authorize.Net, Plug n’ pay or Card Connect), input the API Login ID and Transaction key, and set whether or not the new gateway will require the CVV to process a transaction.
NOTE: With several payment gateways, admins do have the option of adding a ‘Processing Fee’, passing the fee on to the payers. It is the admins responsibility to fully understand the laws governing these fees before using this feature.

When the processing fee toggle is enabled, it opens an option to enter the percentage of processing fee to be added.

- Clicking on ‘Save’ will add it to all payments, and the newly added payment details will be available under the ‘Additional Payment Gateways’. Once added, options to edit or delete the additional gateway is available.
- Admins can also enable or disable additional gateways using the toggle to the right of the gateway name.
- Admins also have the ability to assign rate cards to an additional gateway. Simply click on ‘Rate Card’ and select the rate cards you want from the dropdown menu. If an order is placed using a rate card assigned to an additional gateway, the additional gateway will override the base gateway to process the transaction.
NOTE:
- When receiving a payment for an order that uses a rate card assigned to an additional gateway, the payment will be processed through the additional gateway.
- This overrides the default gateway.
- Any rate cards that are not assigned to an additional gateway will default to the base gateway.
- A rate card can only be assigned to one additional gateway. If a rate card is already assigned to an additional gateway, it will not show up in the dropdown menu to assign a rate card to a gateway.
- When receiving payment for multiple orders, if the orders have rate cards assigned to differing gateways, users will not be able to process payments for them at the same time and they will not be able to consolidate the invoices. (An alert will popup both in the customer portal and in the CRM)
We want to hear from you!
videos relating to


