User Settings enables to setup the limitations and restrictions to the users of the application based on their role.
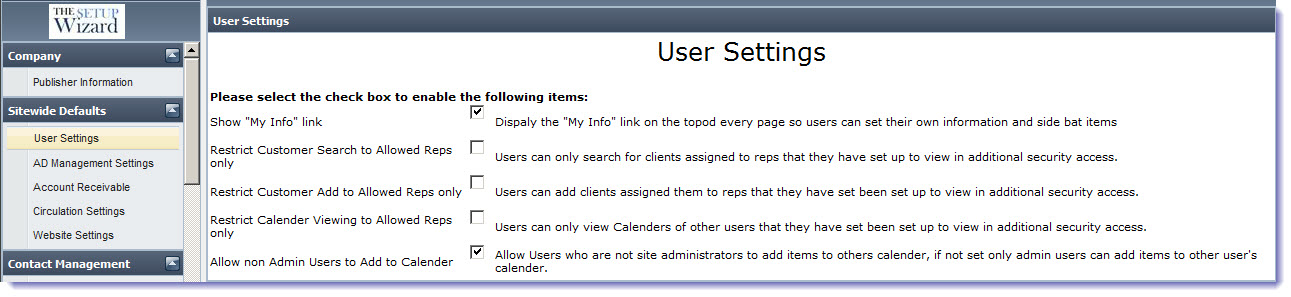
Show “My Info” Link
To enable “My Info” link to a user, select the corresponding check box. “My Info” appears towards the top right corner of every page in the application where the user can update his account information, contact information, and Site Setup information. Sales Rep users can view their sales goals.
Under Site Setup, you can choose the Site Theme, Site Tabs from tabs: Sales Portal, Management, Production, Circulation, and My Portal. You can view several views on your dashboard Sales tab of modules: Sales, Management, Production, Circulation and some general views. You just need to drag and drop the corresponding view block to the sales tab area. Click << to add to active tab, the view will be active and you will be able to see the controls and data under the corresponding view.
Restrict Customer Search to Allowed Reps
To enable “Restrict Customer Search to Allowed Reps” to a user, select the corresponding check box. This allows users to search only the customers assigned to the corresponding sales reps.
Restrict Customer Add to Allowed Reps Only
To enable “Restrict Customer Add to Allowed Reps Only” to a user, select the corresponding check box. This allows users to add only the customers assigned to the corresponding sales reps.
Restrict Calendar viewing to allowed Reps Only
To enable “Restrict Calendar viewing to Allowed Reps Only” to a user, select the corresponding check box. This allows users to view calendars of other specified users.
To Configure these Features:
Go to Management > Site Setup > Users. Click Edit (the pencil icon) of the corresponding employee record. Click Edit Additional Security. Select the check boxes of those employees that will be allowed to access by the current user. On selecting the employees, the current user can only search the contacts of these employees. Even the sales/production reports are restricted to only display info for the users to which the rep has access. If you even select View Only check box, then the current user will not be allowed to edit any details of the corresponding employee.
Note: If you do not choose any employee, then the current user will be able to access all the employees accounts.
Allow Non-Admin Users to Add to Calendar
To enable “Allow non-Admin Users to Add to Calendar” to a user, select the corresponding checkbox. This allows non-SiteAdministrator users to add items to other user’s calendar.
To Configure this Feature:
Go to Management > Site Setup > Users. Click Edit (the pencil icon) of the corresponding employee record. Under Site Info, choose from drop-down whether the user is Administrator or not. Click Edit Additional Security. Select the checkboxes of those employees that will be allowed to access by the current user. Click Edit Site Display Options. Select Create It: Calendar Item.
We want to hear from you!
videos relating to


