Ad Management Settings allows user to choose the operation modes of different functions that are provided in the application.
- Website setup > Company Info > Sitewide Defaults
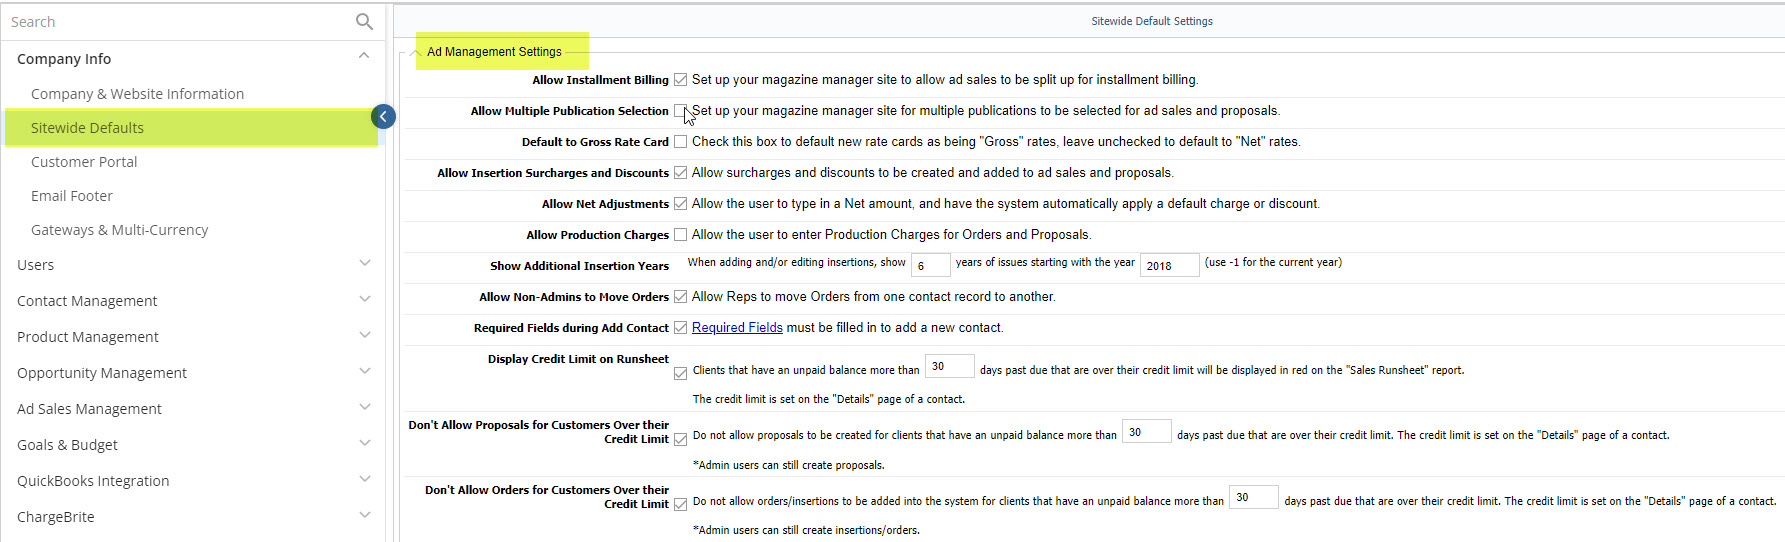
Allow Installment Billing
To enable “Allow Installment Billing” to a user, select the corresponding checkbox. This allows billing of ad sales receivables to be made in installments.
Allow Multiple Publication Selection
To enable “Allow Multiple Publication Selection” to a user, select the corresponding checkbox. This allows selecting multiple products for ad sales where products and ad sales belong to a single publication schedule.
To Configure this Feature:
Go to Management > Website Setup > Users > User Editor. Click Edit (the pencil icon) of the corresponding employee record. Click on the Action Panel button at the top right and select Edit Rep’s Products. Select the checkboxes of those products that this user will be allowed to access, or select Access to All Products. If you do not select any products, the user will not be able to access any products.
Default to Gross Rate Card
To enable “Default to Gross Rate Card” to a user, select the corresponding checkbox. This option assigns every new rate card to “Gross” rate as default. Alternatively uncheck this option to assign every new rate with “Net” rates as default. This option only assigns a default rate to all new rate cards; the user can still edit the rates as desired.
Gross Rate is the charge for an ad, placed by an ad agency with some percent of commission involved. And Net Rate is the charge for an ad, placed by the customer directly.
[Net = Gross – (Gross * Agency% / 100)]
Agency discount is a discount offered to ad agencies that place order for the ads.
Allow Insertion Surcharges and Discounts
To enable “Allow Insertion Surcharges and Discounts” for a user, select the corresponding checkbox. This allows creating surcharges and discounts that help in adjusting ad sales amounts.
To adjust surcharges/discounts to particular rate card, go to Management > Ad Sales Management > Adjustments. While adding/editing adjustments you can define the surcharge/discount and the corresponding amount/percent applied to either Gross Rate or Net rate.
Enter the number of issue years to display when adding/editing insertions
Enter the number of issue years so as when to display adding/editing insertions. Note that the current year is designated with “-1”.
Allow Non-Admins to Move Orders
To enable “Allow non-Admins to Move Orders”, select the corresponding checkbox. This allows non-Site Administrators to move orders from one contact record to another.
To Configure this Feature:
Go to Management > Website Setup > Users > User Editor. Click Edit (the pencil icon) of the corresponding employee record. Under Site Settings, click on the toggle button for Can Create Contracts to enable or disable this feature.
If you enable this feature, the user can move orders from one contact record to another. In a client record you can access orders under the Orders section. Select the desired orders checkboxes, then click Move Orders. Choose the other contact/client to which these selected orders should be moved.
Require Fields During Add Contact
Select this option if the sales reps need to enter a minimum amount of data when adding a new contact. Required fields are the mandatory fields to be entered by sales rep.
To set up these required fields, go to Website Setup > Contact Management > Required Fields. User can enable desired fields as required fields (mandatory fields) when adding a new contact, according to the business requirement.
These fields are pre-defined; user can enable or disable the corresponding field as required.
Fields like company, first name, address and contact number can be made required fields. To mark a field as required, check the box in the Required column.
Note: Custom fields (added from Management > Site Setup > Website Setup > Site Customization > Custom Fields) are not mandatory fields.
Display Credit Limit on Runsheet
Select this option to display those customers that are over their credit limit in a runsheet report. Credit limit is the amount that is setup in the Details page of a contact. To views runsheet report go to Reports > Report Suite > Sales Module in TMM.
Don’t Allow Proposals for Customers Over their Credit Limit
Select this option in order not to allow creating proposals for those clients that are over their credit limit. Credit limit is the amount that is setup in the Details page of a contact.
Note: After enabling this feature also, admin users can still create proposals.
Don’t Allow Orders for Customers Over their Credit Limit
Select this option in order to not allow adding contract/insertions for clients who are over their credit limit. Credit limit is the amount that is setup in the Details page of a contact.
Note: After enabling this feature also, administrator users can still add contracts/insertions.
We want to hear from you!
videos relating to


