When creating proposals in The Magazine Manager, users have the option to select from the list of available proposal templates. Although proposal templates are provided during initial setup of your site, additional proposal templates can be created to handle various sales opportunities.
To access Proposal Templates screen, select menu option Management > Site Setup > Website Setup. Under Ad Management section click Proposal Templates. A list of existing proposal templates is displayed.

To edit existing proposal template, click the pencil icon.
To Delete existing proposal template, click the red circle icon. While deleting system will prompt to confirm deletion.
Click Save after modifications. Click Done to exit.
To Add a New Proposal Template
- Click New Proposal Template. New Proposal Template page is displayed.
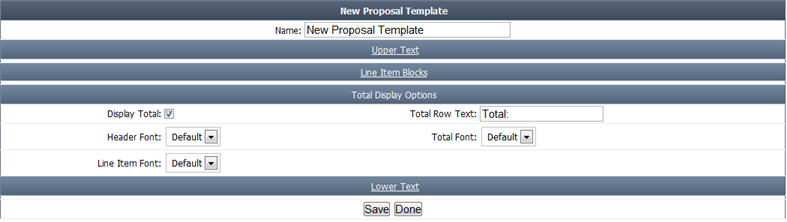
- Enter the Proposal Template name.
- Under Total Display Options, select Display Total to allow displaying total, enter the Total Row Text, choose Header Font and Total Font.
Note: Users have the ability to display different fonts for the header, line items and total drop-downs on the proposal edit page. However users are allowed to select different fonts. The header font now only affects the column headers of the line item blocks. The line item font adjusts the font size for the line item, sub-total and summary rows for all line item blocks. The total font affects the last total row, and is displayed.
- Click Save to save information. Click Done to return to list of proposal templates.
- To add more items to proposal template, click the pencil icon to edit.
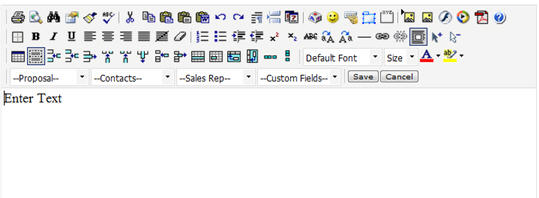
- Click Upper Text to include the header information of the proposal template. Here you can upload logo, address and other header information. You can format the items using the provided format menu. Click Save to update and Cancel to exit.
- Click Line Item Blocks to include Line Items Blocks information. Click Save to update and Done to exit.
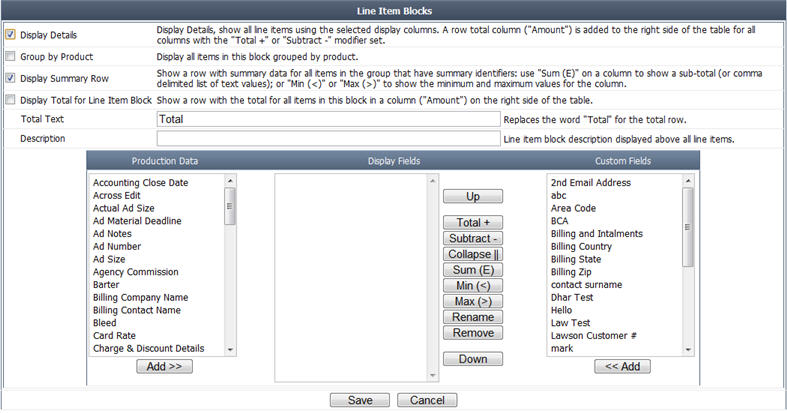
- Add Print Items Block, Add Digital Items Block: Line Item Blocks screen is displayed. You can add a display for items added to this proposal.
- You will be able to setup the display to: group by product within the list, hide/show the line item details, display a sub-total for each product grouping, and set an extra description above the block. Select corresponding check box to enable the display.
- Display Details: Choosing this option displays all line items on the proposal using the columns selected under Production Field Data and Custom Field Data below here.
- Group by Product: Choosing this option displays all line items on the proposal grouped by their product.
- Display Sub-Total: Choosing this option displays a row with sub-totals for all items. Use the sum (E), Min (<) and Max(>) identifiers on a column to show a subtotal, list of values or a minimum and maximum value.
- You will also be able to choose the fields from Production and Custom Field Data that display on the proposal. Choose any field from Production Data or Custom Field Data from the list and click Add. The chosen field will be then added to the list. Now in this list you can choose any field any apply the operator from the operators list. Click Save to save information. Click Done to exit.
- When you add a proposal to a contact based on current proposal template, the chosen print or digital fields are displayed under Line Item blocks of proposal under Display Setup tab.
- Add Payment Schedule: You can add a block to the proposal that displays the payment schedule that has been set up for the items on this proposal. Payment schedule blocks are not editable, they have a fixed display. Click Done to exit.
- Add Custom Line Item: You can add a single general line item with an amount & description. This line item is NOT tied to any product or rate card, and is not “converted/added” to an invoice automatically. Click Save to save the information. Click Done to exit.
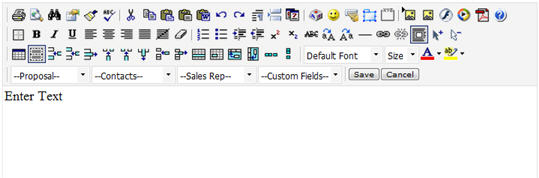
- Click Lower Text to include the lower text items. Here you can upload footer information. You can format the items using the provided format menu. Click Save to update and Cancel to exit.
- To make a duplicate template click Save As and assign a new template name.
We want to hear from you!
videos relating to


