Sitewide Defaults allows the Administrators to set up site defaults for various ad sales management views and options for all users.
To access Sitewide Defaults screen, select menu option Management > Site Setup > Website Setup. Under Company section click Sitewide Defaults. Company Defaults used in the Magazine Manager Application page is displayed. Magazine Manager Sitewide Default Settings page is displayed. Click Save after the set up. Click Done to exit.
Ad Management Settings
Ad Management Settings allows user to choose the operation modes of different functions that are provided in the application.

- Allow Installment Billing: Select checkbox to allow Sales to split up. This allows you to bill your customer in installments.
- Allow Multiple Publication Selection: Select checkbox to enable “Allow Multiple Publication Selection” to a user. This allows selecting multiple products for ad sales where products and ad sales belong to a single publication schedule.
- Default to Gross Rate Card: Select checkbox to enable “Default to Gross Rate Card” to a user. This option assigns every new rate card to “Gross” rate as default. Alternatively uncheck this option to assign every new rate with “Net” rates as default. This option just assigns a default rate to all new rate cards; the user can still edit the rates as desired.
- Allow Insertion Surcharges and Discounts: Select checkbox to enable “Enable surcharges and Discounts” to a user. This allows creating surcharges and discounts that help in adjusting ad sales amounts.
- Allow Net Adjustments: Select checkbox to enable the user to type in a Net amount as desired, and the system automatically applies a default charge or discount.
- Allow Production Charges: Select checkbox to enable “Allow Production Charges”. This allows the user to enter Production Charges for Contracts and Proposals.
- Show Additional Insertions Years: Enter the number of years; the ‘n’ years issues that display when adding/editing insertions. Enter the “starting year”. Note that the current year is also included in the number of years you entered.
- Allow non-Admins to move contracts: Select checkbox to enable “Allow non-Admins to move contracts” to a user. This allows the non-Site Administrators to move contract from one contact to another contact record.
- Require Fields during Add Contact: Select this option to make it mandatory that sales reps enters a minimum amount of data while adding a contact. This turns certain fields (index/primary fields) as “required fields”.
- Display Credit Limit on Runsheet: Select this option to display the customers in sales runsheet report; those customers that have an unpaid balance more than ‘n’ number of days past due and those are over their credit limit. Credit limit is the amount that is setup in Details page of a contact. You can enter the number(30,45,60,90 etc.,) of days past due of an unpaid balance.

- Don’t Allow Proposals for customers Over their Credit Limit: Select this option to disallow creating proposals for clients those are over their credit limit.
- Don’t Allow Contracts for Customers Over their Credit Limit: Select this option to disallow adding contract/insertions for clients those are over their credit limit. Note that the site Administrator users can still add contracts/insertions.
- Default Sales Rep for Item Entry: Choose between “Logged Rep” and “Rep on Client Account” as the default sales rep assigned to a new item on proposals/contracts.
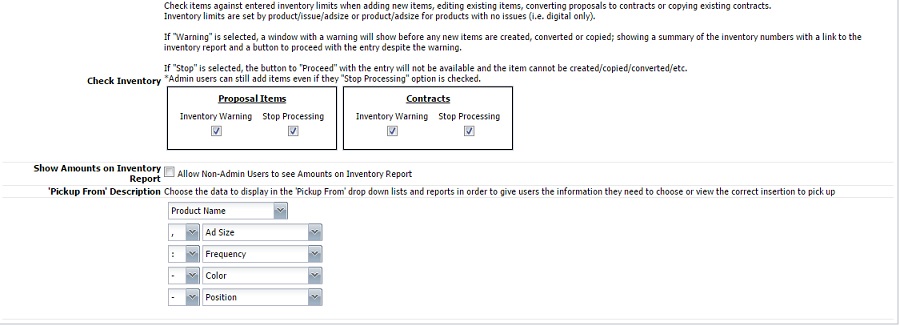
- Check Inventory: Check items against entered inventory limits when adding new items, editing existing items, converting proposals to contracts or copying existing contracts. Inventory limits are set by product/issue/adsize or product/adsize for products with no issues (i.e. digital only).
- If “Warning” is selected, a window with a warning will show before any new items are created, converted or copied; showing a summary of the inventory numbers with a link to the inventory report and a button to proceed with the entry despite the warning.
- If “Stop” is selected, the button to “Proceed” with the entry will not be available and the item cannot be created/copied/converted/etc.
Note: *Admin users can still add items even if the “Stop Processing” option is checked. Inventory numbers are set to specific ad sizes/issues by editing a product from Management>Site Setup>Products, edit a product, select View Inventory.
- Show Amounts on Inventory Report: Select checkbox to allow Non-admin Users to see Amounts on Inventory Report.
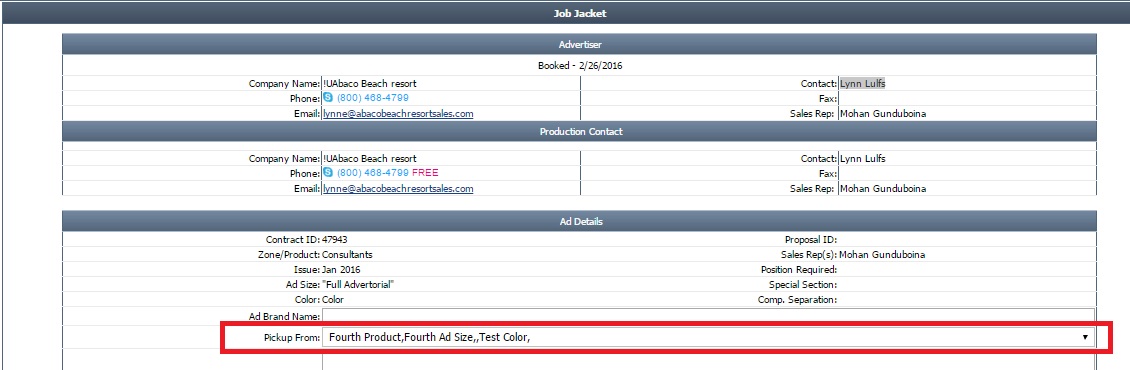
- ‘Pickup From’ Description: Choose the data in which model to display in the “Pickup From” drop-down list. This Pick From field allows you to choose or view the correct insertion.
- Ex: If you choose Product Name, Ad Size, Frequency, Color, Position. You have the following data in your drop-down list: “x product, 1/2 size, 2x, x color, x position”

Accounts Receivable
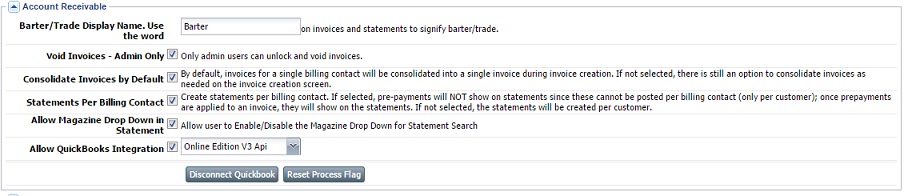
- Barter/Trade display Name Use the Word: Enter the name to display on invoices and statements to signify barter/trade. This field is displayed in Contract and Proposal pages.
- Void Invoice-Admin Only: Select checkbox to enable “Void Invoice-Admin Only”. This option allows only admin users to unlock and void invoices.
- Consolidate Invoices by Default: Enable this option to make it default, consolidate invoices of a billing contact into a single invoice during creation of an invoice.
- Statements Per Billing Contact: Create statements per billing contact. If selected, pre-payments will NOT show on statements since these cannot be posted per billing contact (only per customer); once prepayments are applied to an invoice , they will show on the statements. If not selected will be created per customer.
- Allow Magazine Drop Down in Statement: Allow user to Enable/Disable the Magazine drop-down for statement search.
- Allow QuickBooks Integration: To enable QuickBooks Integration with the Magazine Manager, select the checkbox. Choose the QuickBooks Financial Software from the drop-down list. Note that the complete finance analysis is bound to this chosen option.
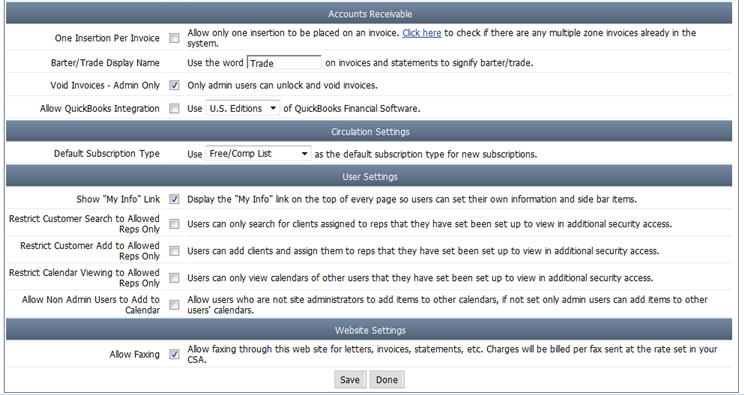
Circulation Settings

Choose the Subscription type from the drop-down list to set as the default subscription type for new subscriptions. Subscription Types are typically used for auditing of circulation data. The list of subscription types available are:
- Paid Subscription: This indicates that the subscription is paid by the subscriber.
- Free/Requestor: This indicates the magazine is sent to the subscriber for free, however subscriber requested to receive the magazine.
- Free/Non-Requestor: This indicates the magazine is sent to the subscriber for free, however the subscriber did not request to receive the magazine.
- Free/Comp List: This indicates the magazine is sent to the subscriber for free. Typically a “Comp List” refers to copies of the magazine sent to either existing advertisers or prospective advertisers.
Contact Management

- Allow Ad Number Editing: Select checkbox to allow user to edit the ad number on a contract.
- State/Region Input: Choose from Drop down list and Textbox to select US states and Canadian Regions or use a text box to type in the region/state.
User Settings
User Settings enables to setup the limitations and restrictions to the users of the application based on their role.

- Show Right Hand Navigation Panel for Non-Admin Users: Select checkbox to enable Right Hand Navigation Panel to a user. Right Hand Navigation Panel appears towards the top right corner of every page in the application where the user can update his account information, contact information, and Site Setup information.
- Restrict Customer Search to Allowed Reps: To enable “Restrict Customer Search to Allowed Reps” to a user, select the corresponding checkbox. This allows users to search only the customers assigned to the corresponding sales reps.
- Restrict Customer Add to Allowed Reps Only: To enable “Restrict Customer Add to Allowed Reps Only” to a user, select the corresponding checkbox. This allows users to add only the customers assigned to the corresponding sales reps.
- Restrict Calendar viewing to allowed Reps Only: To enable “Restrict Calendar viewing to Allowed Reps Only” to a user, select the corresponding checkbox. This allows users to view calendars of other specified users.
- Allow non-Admin Users to Add to Calendar: To enable “Allow non-Admin Users to Add to Calendar” to a user, select the corresponding checkbox. This allows non-SiteAdministrator users to add items to other user’s calendar.
Email Settings
Sending summary reports and notifications via email to reps.

- Enable Email Capture: Captures Emails used for campaigns. Email will be sent to the Rep when the feature is enabled.
- Summary Email Notifications: Enable email notifications summary to the user.
- Marketing Manager Notifications: Enable Marketing Manager Notifications to the user.
If this feature is disabled, all the Marketing Manager Notification settings for all users will be removed. After enabling the feature one will need to add notification settings once again.
Campaigner
Campaigner helps you create and send email newsletters to your subscriber lists with ease, speed and creativity. Contactology offers an array of tools for beginners and experts.
Google Calendar Sync
Google Calendar Integration facilitates user to sync the user’s google calendar with Magazine Manager calendar.
Note: To integrate Google Calendar with Magazine Manager calendar, user must have a google account.

We want to hear from you!
videos relating to


