How to Create a Subscription Plan
Admins can create a Subscription Plan using the navigation: Website Setup >> ChargeBrite >> Plans
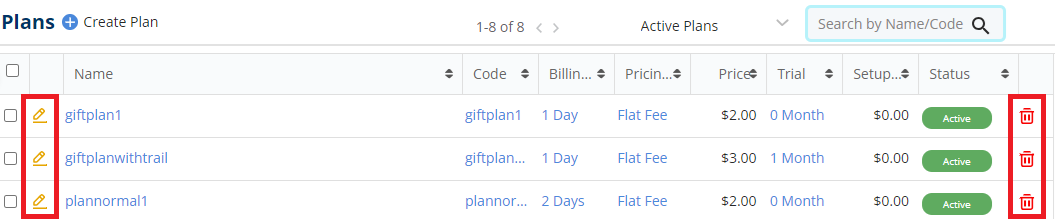
- It will display a list of existing Plans. Users can use the pencil or trash icons to Edit or Delete the existing plans.
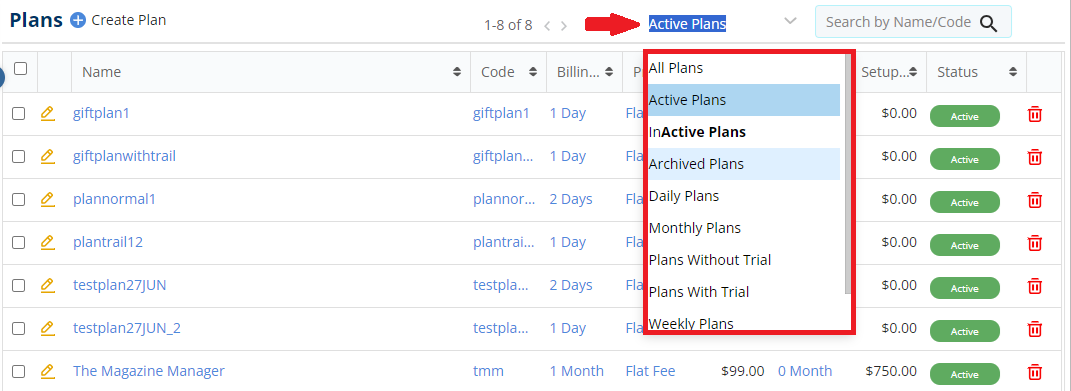
- At the top-right corner of the page is a drop down containing all the list of all Active, In active, Archived, Daily, Monthly, Weekly and Yearly Plans , along with Plans with and without trial.
- The Search text box lets you search for a particular plan.

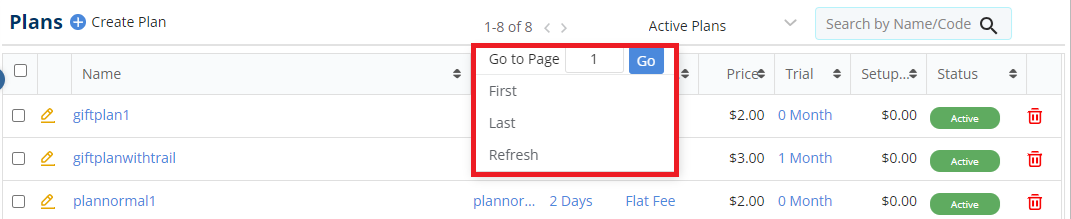
- The pagination in the center of the page lets you go to a specific page, Refresh or jump to the First and Last page.
- To create a new plan, click on the blue plus icon with the label ‘Create Plan’ at the top-left corner of the page.
![]()
This will create a new plan with the subscription status as “Active”. The ‘Save’ and ‘Cancel’ buttons lets you save the plan or cancel the changes.

The page outlines the price, frequency, conditions, and duration of the subscription available for purchase. Apart from this, Add-Ons and Coupons can be included with plans to provide subscribers with additional package benefits and discounts.
Details
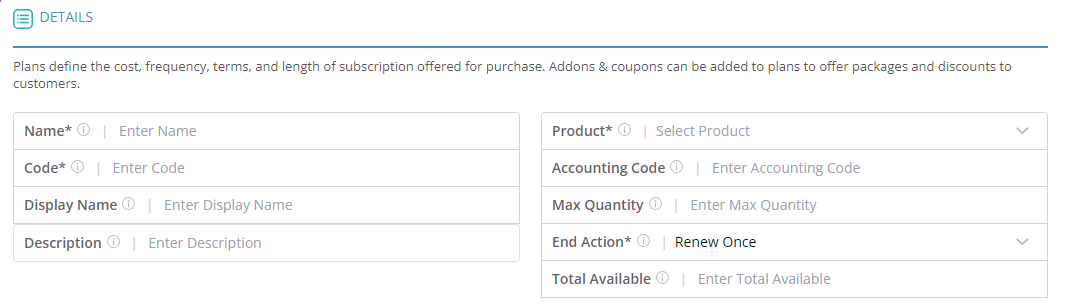
- Name: Every plan needs to have a distinct name. Duplicates are not allowed.
- Code: A plan code can be used in identifying the plan across reports, invoices, and other screens. If necessary, you have the option to edit it.
- Display Name: You can have a “Display Name” set to be displayed on the checkout pages and customer portal for subscriptions to this plan.
- Description: You can describe the plan for more information about it.
- Product: You can choose a subscription product type available for purchase with this plan. Each billing cycle of a subscription will generate an order within the CRM, which can then be invoiced, paid, and stored.
- Accounting Code: An optional accounting code can be used to categorize orders, invoices, and payments for subscriptions to this plan.
- Max Quantity: You can limit the number of plans that can be purchased in a single transaction. If left blank, it will default to no limit.
- End Action: You can choose what happens to subscriptions after their last billing cycle. There are four options in this drop down:
-
- Expire – After last billing cycle, the subscription is complete. This will do nothing.
- Renew Once – At the last billing cycle the subscription is copied with its End Action set to Expire. The Subscription will be active for one more term.
- Auto Renew – At the last billing cycle renew/copy the subscription for another full term and set the End Action to Auto Renew. The Subscription will continuously renew.
- Until Cancelled – A single billing cycle is charged once at the start of the subscription and it never has to be paid for again.
- Total Available: You can enter a value such as to limit the number of subscriptions of this plan by all subscribers from the checkout pages or the ChargeBrite application.
Pricing

- Pricing Model: Admins can choose and setup a pricing model. These are of 5 types – Flat Fee, Per Unit, Tiered, Volume and Stairstep. The pricing model will determine the price per billing cycle of any subscriptions purchased for this plan. To view examples and more details about the different pricing models, click on the ‘more’ link available within the tool tip icon.
- Setup Fee: You have the option to include a compulsory setup fee in the initial billing cycle for all subscriptions to this plan. This fee is applied only once and does not repeat in subsequent billing cycles.
- Rate: Admins can set a base rate of the plan (prior to Add-Ons or setup fees), the flat fee pricing model ignores quantity.
Billing
In this section, admins can setup the frequency and duration of each cycle for subscriptions to this plan. Upon the start of each billing cycle, the subscription will initiate the essential orders, invoices, payments (if auto-pay is enabled), and notifications. During the final billing cycle, any end actions such as renewals and notifications will be handled as per the settings stated here.
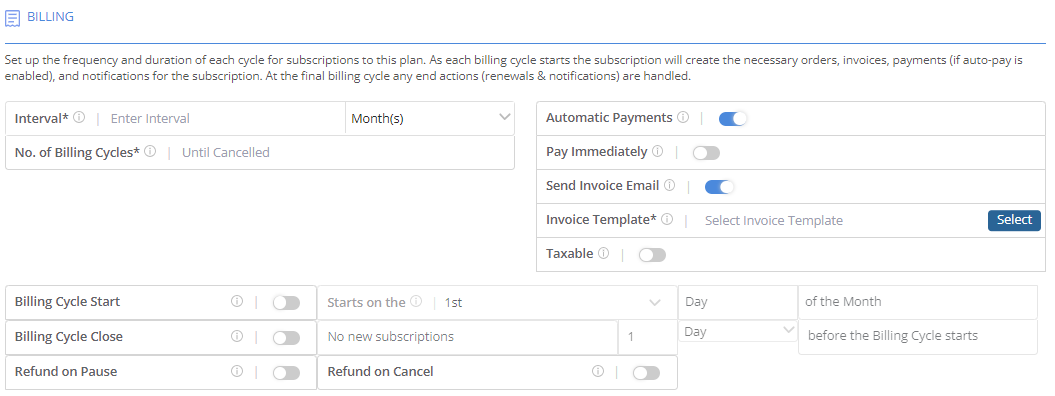
- Interval: Admins can set the duration of each billing cycle. For Example, for a monthly subscription enter 1 and choose months. Each subsequent billing cycle will start after this interval.
- No. Of Billing Cycles: The subscription term is decided by the number of billing cycles entered here. At the start of each cycle, the subscriber’s credit card is charged for the plan rate and any additional fees, and orders and invoices are generated. The number of billing cycles is initially fixed for subscriptions from the checkout pages, but it can be changed through the web interface later on.
- Automatic Payments: If enabled, automatic charges will be applied and a payment will be done at the start of each billing cycle. The subscription workflow will try to get the payment and create invoices, orders, and even subscription renewals. Furthermore, non-payment decisions and notifications can be customized using workflows.
NOTE: Should the automatic payments be disabled, the invoices are created and all billing and payments can be done through Accounts Receivable section in the CRM or using the customer portal.
- Pay Immediately: Should this toggle be enabled, payments for subscriptions to this plan will be charged whenever the subscription is purchased.
- Send Invoice Email: With this toggle enabled, it will send an email automatically when the subscription is created, along with a link to download the invoice for this subscription order.
- Invoice Template: The Invoice templates available within the Website Setup will be displayed here.
- Billing Cycle Start: With this toggle enabled, all billing cycles can be allowed to start on a specific day. If the subscription is bought before the start of the billing cycle, its start date or first billing cycle will start on the next start date available.
- Billing Cycle Close: With this toggle enabled, admins can start to reserve some time before each billing cycle during which new subscriptions cannot be initiated. This enables a fulfillment period where no new subscriptions should be added.
- Refund on Pause: With this toggled enabled, should the subscriber choose to pause the subscription, they will receive a refund on their purchase. The cost to resume the subscription after pausing depends on the Billing Type Alignment.
- Refund On Cancel: With this toggled enabled, the subscriber gets a refund if the subscription is cancelled.
Add-Ons
Add-Ons are additional products available for purchase alongside a subscription plan. The Add-Ons can be recurring or one-time. A recurring add-on is charged each billing cycle. Mandatory Add-Ons will always be purchased with the plan.

- To create your own Add-Ons package and customize your product catalog to suit your needs, click on the blue plus icon beside the ‘Add-Ons’ label. This will open the ‘Create Addon’ page.
![]()
- Through here, enter the details like Name, Code, Description, Product, Accounting Code, Charge Type, Pricing Model and Rate for the new Add-on.

- You can also create a Coupon applied to be applied to every subscription to this plan. These can be used to provide flexible pricing options for plans, Add-Ons and specific billing cycles.
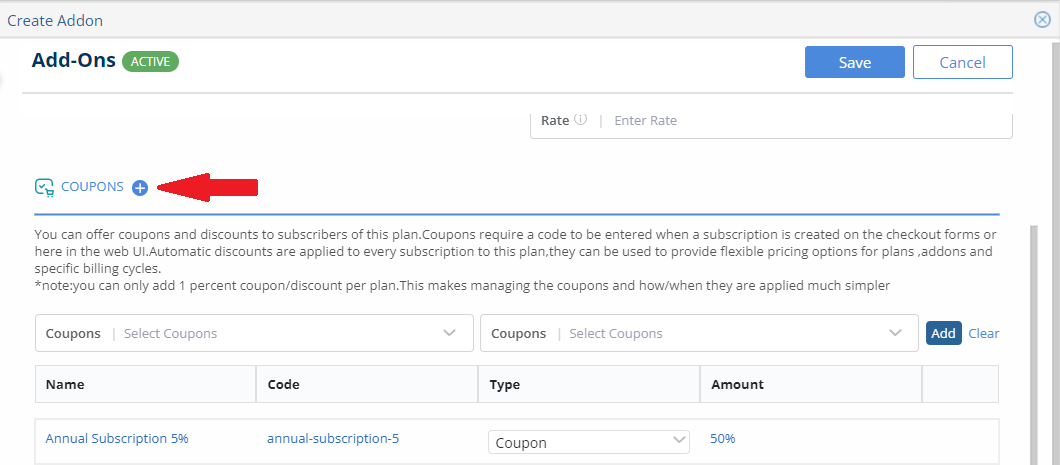
- The second ‘Coupons’ drop down will auto populate and display the Code based on the ‘Coupons’ selected in the first drop down.

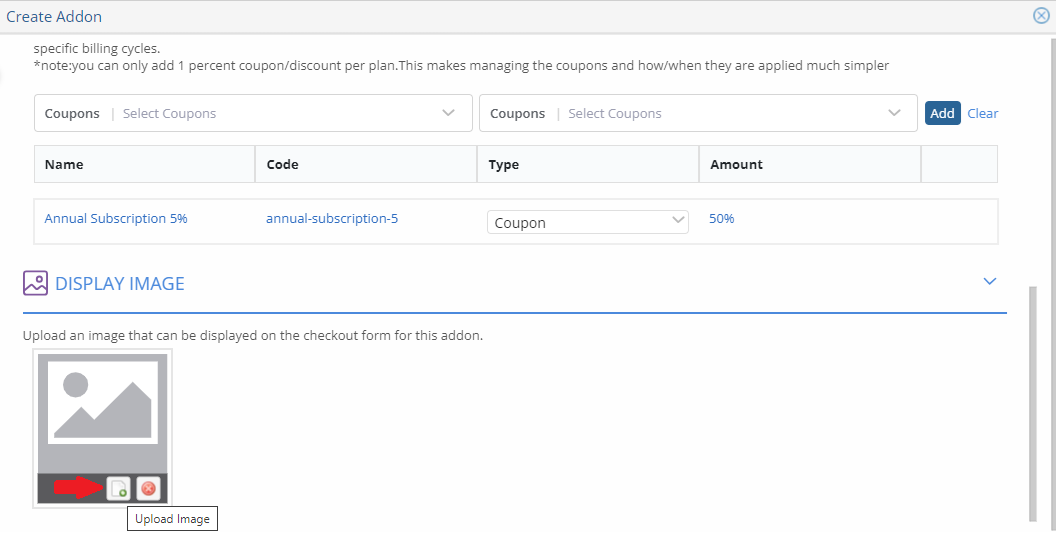
- The ‘Display Image’ section allows you to upload an image that can be displayed on the checkout form for this add-on.
NOTE: Add-Ons can also created using the ‘Create Addon’ button available in the path: Website Setup >> ChargeBrite >> Add-Ons
Coupons
You have the option to provide coupons which are nothing but discounts being offered to the subscribers of this plan. To create a coupon of your choice, click on the blue plus icon beside the ‘Coupons’ label.
 This will redirect you to the ‘Create Coupon’ Page, where you will find the following options:
- Name, Code, Description.
- Apply On: Apply the coupon to the invoice amount to discount the entire price of a billing cycle. Additionally, you may choose to apply the coupon solely to each specified item, whether it be the plan or Add-Ons.
- Discount Type: You can select whether the coupon should provide a flat discount or be calculated as a percentage of the total in a billing cycle.
- Duration Type: This drop down provides you with the flexibility to select how many billing cycles a coupon should be applied to and are categorized into 3 types:
-
- One Time -The coupon is only applied to the first billing cycle. Subsequent billing cycles will be charged at a higher rate.
- Forever – The discount is taken from every billing cycle. Forever coupons are copied to subsequent renewals.
- Limited Period – Should you choose this duration type, you have to enter the number of billing cycles to apply this coupon to, starting from the first cycle. These coupons will not be copied when subscriptions are renewed.
-
- Set the maximum number of times a coupon can be used across all or a Single customer whenever this plan is purchased using the Maximum Redemption and Redemption per Customer options.
- NOTE: Once this limit is reached, the coupon code will no longer be validated or applied to any new subscriptions.
- Valid Until: This option sets an expiration date for the coupon. After this date the coupon code will not be validated or applied to any new subscriptions.
- NOTE: Coupons can also created using the ‘Create Coupon’ button available in the path: Website Setup >> ChargeBrite >> Coupons
- Set the maximum number of times a coupon can be used across all or a Single customer whenever this plan is purchased using the Maximum Redemption and Redemption per Customer options.
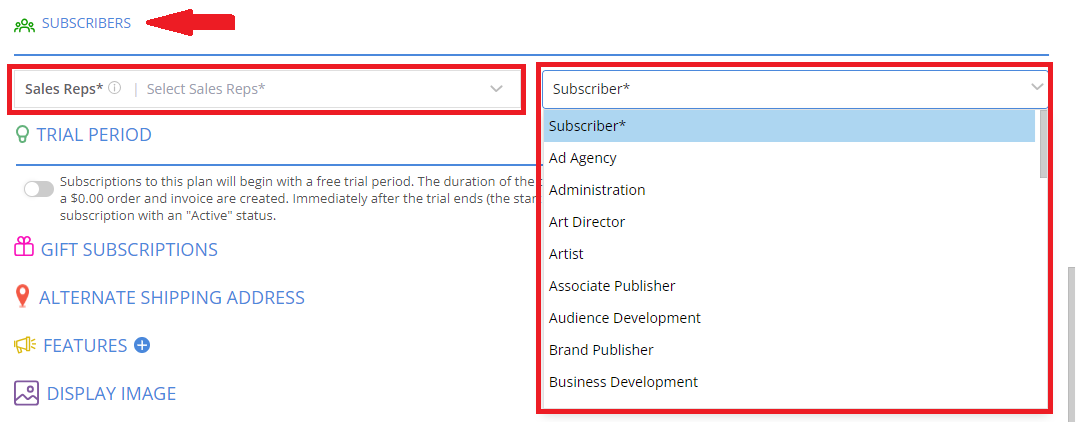
Subscribers
Through this section, new Subscribers for a specific Contact Type can be assigned to the plan.
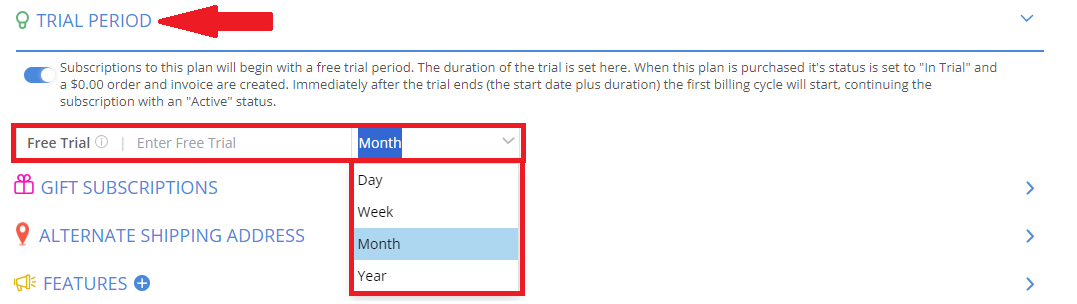
Trial Period
Subscriptions to this plan will begin with a free trial period, with the duration of the trial set here. Upon purchase, the plan’s status will be displayed as “In Trial,” and a $0.00 order and invoice will be created. Following the conclusion of the trial period (the start date plus the specified duration), the first billing cycle will begin, displaying the subscription status to “Active”.
- Enabling the toggle will give two options to enter the duration between the start date and the commencement of the first billing cycle.
Gift Subscriptions
This section allows the purchase of gift subscriptions for this plan on behalf of subscribers. When enabled, the checkout pages will prompt for a separate billing contact who will be charged for each billing cycle of the subscription. The purchaser will receive invoices and receipts, while all other communication and portal access for the subscription will be directed to the subscriber as usual.
 As soon as the toggle is enabled, two options appear below:

- Expiry: This options lets you specify the time frame within which the gift must be claimed. Unclaimed gift subscriptions are canceled and not accessible for any action after the expiry date.
- Auto Claim: With this toggle enabled, it will automatically claim the gift for a subscriber without their approval. The subscription will be created, and the first billing cycle will be charged to the Gifter.
Alternate Shipping Address
With this toggle enabled, any subscriptions requested will display the alternate shipping address instead of the primary one.

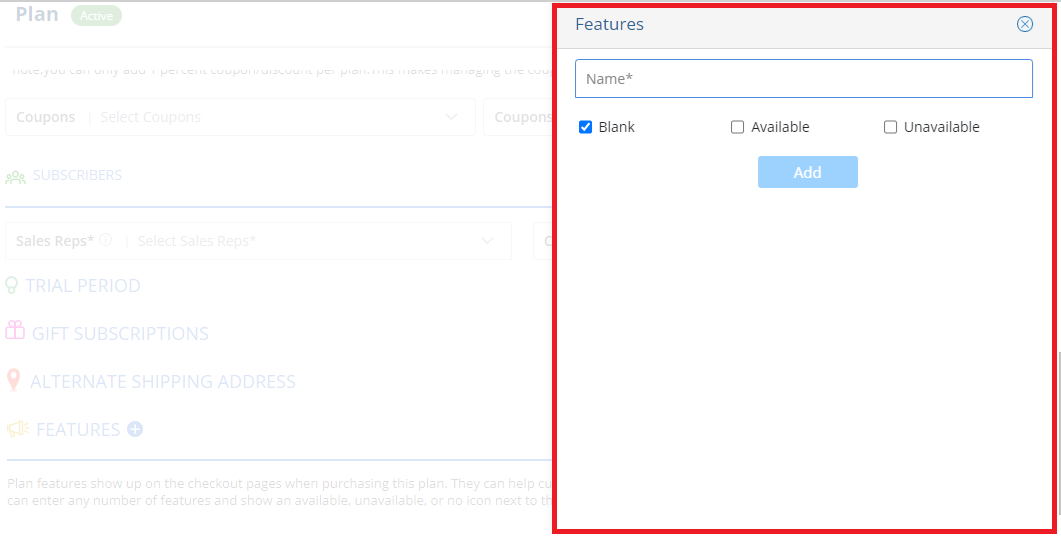
Features
The features section is used to show up on the checkout pages when purchasing the plan.

- To add a new Feature, click the blue plus icon beside the ‘Features’ label.
- This will open a side panel where they can create a new feature, select availability, and then click ‘Add.’
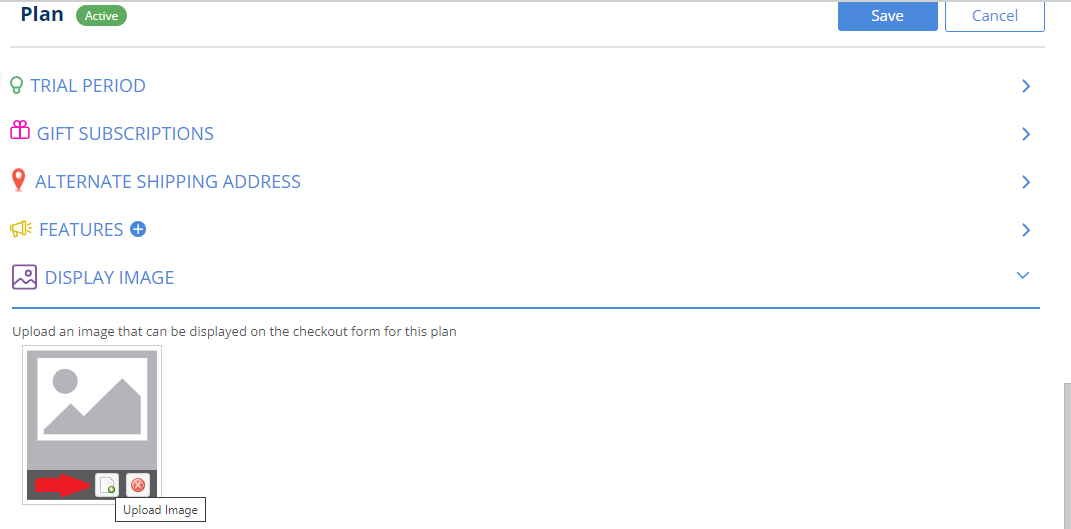
 Display Image
You also have the option to upload an image by hovering over and selecting the ‘Upload Image’ option. This image will be displayed on the checkout form for the plan.
We want to hear from you!


